Let me discuss about Single Sign-on (SSO) functionality in MOSS 2007. This is a very useful feature in MOSS 2007 that lets you interact with external data in a secure manner.
I have seen many useful blogs that give you introduction to MOSS 2007 SSO. I am going to try to differ a little bit by walking you through basic steps of configuring external data sources and accessing the data using a web part in MOSS 2007.
Why do we need to use MOSS 2007 – Single Sign-On (SSO)?
MOSS 2007 SSO facilitates securely accessing external data sources from MOSS 2007. The major advantage with using this approach is all external data source credentials passed to MOSS 2007 are encrypted and just plain text. You may be accessing ERP systems like Siebel, SAP which may in turn be using any databases and you don't want to be passing your login credentials without encryption. Further, BDC can be configured to use SSO to access external data securely.
In our example, we will access a SQL Server database. For demo purposes, I have created a SQL Server 2005 database named "SSODemo". I have one table named "Customer" with 2 columns "CustomerName varchar(50)" & "CustomerPhone varchar(12) and a user with username "ssoDemoUser" has necessary privileges to access the database and perform DML operations.
Step 1: Navigate to Central admin — Operations — Manage Single Sign-On (should be listed as the last option under "Security Configuration" section )
If you get an error message on the screen which says
"Failed to connect to Microsoft Single Sign-on Service. To configure, please ensure the service is running"
go to Services and start the "Microsoft Single Sign-on Service" and refresh the Manage Single Sign-on page.
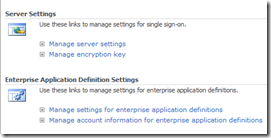
2: Select Manage server settings under Server settings
3: Enter all required information in the "Manage Server Settings for Single Sign-On". and submit the form.
If you get an error message which says "You don't have rights", go back to the services and change the Logon credentials for "Microsoft Single Sign-on Service" to the exact domain account you will be using for the "Account name" shown in the screen shot.
Once the submit is successful you will be redirected back to the main screen. You will now see the "Manage encryption key" link enabled. If you click on it, you will be able to create,backup and restore encryption keys used in SSO operations.
4: Next step is creating a new Enterprise Application Definition. Click on "Manage settings for enterprise application definitions" and then "New Item"
5: Fill in the information as shown in the screen shots below
Note that username and password are 2 login credentials that we need apart from the datasource (which we will define using Share Point Designer — SPD) to access the SQL Server database. In terms of external ERP systems, you can define all the login elements required in this screen. Once you have entered all the information, submit the form.
6: Next option is to set up account information. (select the 2nd option under "Enterprise Application Definition Settings). The screen that loads will enable you to setup new account information. I had created a domain group called SSO Users, but you can use any valid group in your domain.
On the next screen, we enter our SQL Server username and password. Recollect that I had created an user named "ssoDemoUser"
Select "Done" on the next form.
7: Next is configuring the data source using SPD. In SPD, open Data Source Library under Task Panes and select Database Connections — Connect to a database.
Select Configure Database Connection
In the Configure Database Connection, key in the server and for authentication select SSO
In the Single Sign-On settings, key in the following information (DemoSSOApplication was the application name we defined in the enterprise application definition)
If the connection is successful, you will see the next screen where you can pick the option to run a SQL command or stored procedure. Select the "specify custom Select" option to enter custom queries.
Select "Edit Command" button to enter a SQL statement
Select "OK" to all other forms.
8: You will now see a "Custom Query" section under
Drag and Drop the Custom Query to any page in your site. Check-in and Publish the page. You will now be able to see a web part displaying the query results from the database.
Pretty cool?
This is just a basic demo of showing MOSS SSO features. It is a powerful feature within MOSS 2007 to access disparate data sources securely.


