Page copy protected against web site content infringement by Copyscape

With all the buzz going on about ALM Assessment and why it is required, this post aims to demystify ALM. I will try to lay this as simple as possible.

1. What is ALM?

ALM stands for Application Lifecycle Management. It is management & co-ordination of all software development lifecycle activities like requirements gathering, requirements modeling, code development, build process, testing activities and implementation events.

2. What areas does ALM cover?

  • Program & Project Management & Planning
  • Software Architecture & Design
  • Requirements Gathering & End-user experience
  • Software Development
  • Testing & QA
  • Deployment, Operations Management, Compliance & Governance
  • SCM (Software Configuration Management)

3. Is ALM Assessment required for my company?

Does your team have the “just develop it” attitude towards software development?

Does your development team encounter application development pain points (lack of proper requirements gathering, software delays, missing code quality, lack of co-ordination between disparate teams, business objectives not met) ?

Answering these 2 questions will you give you some insight into areas of improvement and need for ALM assessment.

4. What are the benefits of ALM Assessment?

  • Identify failure points
  • Identify areas of process improvement
  • Understand how to address traceability & visibility of lifecycle activities.

5. Truly, will I get something useful after an ALM Assessment?

I would have to answer that with my experience so far. I do see a big value in doing an ALM assessment. Do with the right company. Tap into your local Microsoft regional center and find out the qualified Microsoft partner who can get it done right. Microsoft has an elaborate ALM Assessment program, but that is not the end of the story. You need a subject matter expert to come and meet with your team and go over your team lifecycle activities. He/She will suggest the next steps and how to effectively introduce ALM to your team. Be open with the ALM expert and lay out all the pain points your team is experiencing. Remember, they are there to help you streamline your process. The more useful information you can give, the better for the expert to suggest practical steps to take.

6. What are the tools required by my team to start using Microsoft ALM processes?

1. VSTS (Visual Studio Team System)

2. TFS (Team Foundation Server)

7. Is there a particular version number for your tools?

If you are starting out new, go with VSTS 2008 and TFS 2008. If you have an existing 2005 code base and don’t have plans to upgrade any time soon, you can use the 2005 version.

8. We have Visual Basic code base, can we still use ALM tools?

Yes. Microsoft does provide a MSSCCI Provider for TFS 2008/2005. You can configure MSSCCI provider and be able to integrate VB 6.0 with TFS server.

9. I am done with ALM assessment, what is our next step?

Once the ALM assessment is done and you have given the practical steps to take, the next thing is figuring out the tools purchase. Do you have the VSTS (or) TFS? You can use TFS with any VS 2008 Professional edition with Team explorer, but I would strongly suggest using the VSTS edition. Why take the ALM initiative without the proper tools in place?

10. Can ALM implementation deliver benefits for my team?

Yes. If you have implemented it right,  you can see improvements in

  • Code Quality (just as an example — traceability will be high and everyone in your team will strive to code better as they don’t want to be singled out during a build failure process)
  • High accountability (Check in Policies – I don’t want to outline all features of TFS here, but you can enforce some strict check-in policies that can ensure checked in code quality is good and the developer is accountable to make that happen)
  • Project management improvements (tie this into Project server and you will reap more benefits)
  • Compliance will become big. Yes with that the governance initiatives will start making progress.

11. What are the different ALM Roles?

Note: These roles can be shared between individuals. But, you need to keep a tab on not letting it overwhelm your team members.

  • Software Architect
  • Software Developer
  • Creative Designer
  • DBA & Operations Management
  • QA Tester
  • Project Manager & Business Analyst

Of course, every project will have a stake holder. That role will always be handled by a separate member of the company.

12. Any final field notes?

There are plenty. But I  will confine it to basic steps

“Do not push all the ALM features of TFS 2008 to your team. That will surely overwhelm them and they will be spending time to cope up with the tool rather than concentrating on their current projects. I can’t emphasize this enough “take baby steps in ALM implementation”. That is the only way you will garner support from your team members. Your team members will become more accountable and you need to handle reactions that you get. Introduce features one at a time (For example: Basic check in policy, code quality metrics and code traceability) and let them get comfortable with using each feature before jumping to the next one.”


Page copy protected against web site content infringement by Copyscape

This post will outline how to configure search in MOSS 2007 so that search results do not crawl other site collections and how to use Search Scopes to implement this.

If you search on the web, you will find numerous articles on general MOSS 2007 Search configuration. So, I am not going to repeat that here. My goal is to help you understand Search Scope in MOSS 2007 and restrict crawl results against other site collections.

Scenario:

  • SSP (Shared Services Provider) was configured in Central Administration using standard settings.
  • Web application is created on Port 80:  http://dev1
  • Root site collection (named "Dev Portal") is created on dev1 using publishing site template.
  • Using Central administration a managed path with name "finance" is created.
  • Site collection (named "Finance Portal")  is created on the managed path (http://dev1/finance)  using publishing site template.

Requirement:

If you search on Dev Portal, the results returned should be confined only to Dev Portal site collection and not the site collection present under Dev Portal(i.e. no results from Finance Portal) and vice versa.

Approach:

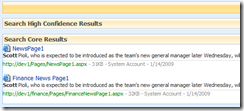
I searched for a keyword "scott" on my Dev Portal and this is the result I got

image

As you can see, I have 2 listings (one from the root site collection — Dev Portal and the other from site collection created on the managed path — Finance Portal)

Now, let me perform the same search on the Finance Portal

image

Ok, so now let us go about creating search scope and confining the search results only to the respective site collection.

1. Navigate to Site Actions — Site settings — Modify all site settings in the Dev Portal

2. Select "Search Scopes" under "Site Collection Administration"

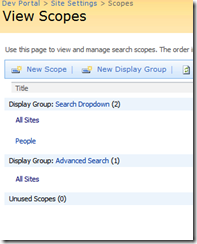
3. In the window that displays, select New Scope

search_Scope3

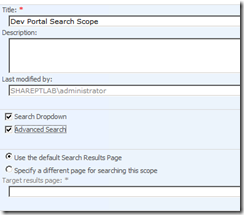
4. Type in the name of the scope as shown and check the Search Dropdown & Advanced Search check boxes. These are the standard display groups.

search_Scope4

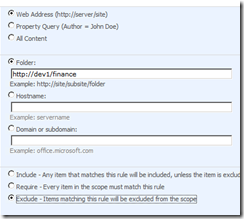
5. Once the new scope is created, add new rules to the scope.  The first rule is shown in the screen shot below. This rule ensures that finance site collection is excluded from the search performed in the Dev Portal

search_Scope5

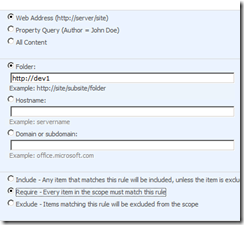
6. Add one more rule and in this rule, add the root site collection and set the Behavior to "Require" as shown in the screen shot. When you are done with setting the rules, the compilation will take place as per the schedule. Let the compilation finish.

search_Scope6

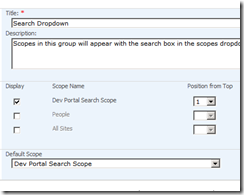
7. Click on the "Search Dropdown" option on the View scopes screen and make the changes shown in the screen shot. I have unchecked "All sites" and "People". You can keep them based on your requirement.

search_Scope11

Repeat the same settings for "Advanced Search"

image

8. Now we are done with the Search scopes screen. Perform any type of search on Dev Portal so that the search results page is display. Click on Site Actions — Edit Page and select the "Search core results" web part.

search_Scope8

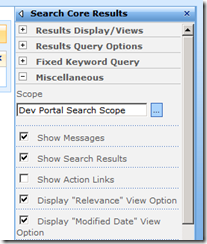
Select edit — Modify shared web part and under Miscellaneous section, set the scope to "Dev Portal Search Scope". Re-call that this is the name of the new search scope we had created.

search_Scope9

Click "Ok", check-in, publish, approve the page.

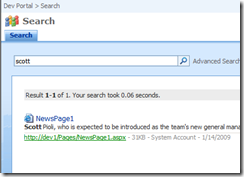
9. Now, go back to Dev Portal home page and perform the search again for the keyword "scott" and you will see that only search result is retrieved and it is confined to only the "Dev Portal" site collection.

search_Scope10

10. You can repeat the same steps for "Finance Portal" site collection with the exception of Step 5.

Hope this posting helped you understand the concepts of Search Scopes and how to utilize them to confine search results to specific site collections.

Page copy protected against web site content infringement by Copyscape

Let me discuss about Single Sign-on (SSO) functionality in MOSS 2007.  This is a very useful feature in MOSS 2007 that lets you interact with external data in a secure manner.

I have seen many useful blogs that give you introduction to MOSS 2007 SSO. I am going to try to differ a little bit by walking you through basic steps of configuring external data sources and accessing the data using a web part in MOSS 2007.

Why do we need to use MOSS 2007 – Single Sign-On (SSO)?

MOSS 2007 SSO facilitates securely accessing external data sources from MOSS 2007. The major advantage with using this approach is all external data source credentials passed to MOSS 2007 are encrypted and just plain text. You may be accessing ERP systems like Siebel, SAP which may in turn be using any databases and you don't want to be passing your login credentials without encryption. Further, BDC can be configured to use SSO to access external data securely.

In our example, we will access a SQL Server database. For demo purposes, I have created a SQL Server 2005 database named "SSODemo". I have one table named "Customer" with 2 columns "CustomerName varchar(50)" & "CustomerPhone varchar(12) and a user with username "ssoDemoUser" has necessary privileges to access the database and perform DML operations.

Step 1: Navigate to Central admin — Operations — Manage Single Sign-On (should be listed as the last option under "Security Configuration" section )

If you get an error message on the screen which says

"Failed to connect to Microsoft Single Sign-on Service. To configure, please ensure the service is running"

go to Services and start the "Microsoft Single Sign-on Service" and refresh the Manage Single Sign-on page.

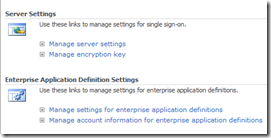
2: Select Manage server settings under Server settings

image

3: Enter all required information in the "Manage Server Settings for Single Sign-On".  and submit the form.

image

If you get an error message which says "You don't have rights", go back to the services and change the Logon credentials for "Microsoft Single Sign-on Service" to the exact domain account you will be using for the "Account name" shown in the screen shot.

Once the submit is successful you will be redirected back to the main screen. You will now see the "Manage encryption key" link enabled. If you click on it, you will be able to create,backup and restore encryption keys used in SSO operations.

4: Next step is creating a new Enterprise Application Definition. Click on "Manage settings for enterprise application definitions" and then "New Item"

sso_serversettings3

5: Fill in the information as shown in the screen shots below

image

image

Note that username and password are 2 login credentials that we need apart from the datasource (which we will define using Share Point Designer — SPD) to access the SQL Server database. In terms of external ERP systems, you can define all the login elements required in this screen. Once you have entered all the information, submit the form.

6: Next option is to set up account information. (select the 2nd option under "Enterprise Application Definition Settings). The screen that loads will enable you to setup new account information. I had created a domain group called SSO Users, but you can use any valid group in your domain.

image

On the next screen, we enter our SQL Server username and password. Recollect that I had created an user named "ssoDemoUser"

image

Select "Done" on the next form.

7: Next is configuring the data source using SPD.  In SPD, open Data Source Library under Task Panes and select Database Connections — Connect to a database.

image

Select Configure Database Connection

image

In the Configure Database Connection, key in the server and for authentication select SSO

image

In the Single Sign-On settings, key in the following information (DemoSSOApplication was the application name we defined in the enterprise application definition)

image

If the connection is successful, you will see the next screen where you can pick the option to run a SQL command or stored procedure.  Select the "specify custom Select" option to enter custom queries.

image

Select "Edit Command" button to enter a SQL statement

image

Select "OK" to all other forms.

8: You will now see a "Custom Query" section under

image

Drag and Drop the Custom Query to any page in your site. Check-in and Publish the page. You will now be able to see a web part displaying the query results from the database.

image

Pretty cool?

This is just a basic demo of showing MOSS SSO features. It is a powerful feature within MOSS 2007 to access disparate data sources securely.