Page copy protected against web site content infringement by Copyscape

Let me discuss about Single Sign-on (SSO) functionality in MOSS 2007.  This is a very useful feature in MOSS 2007 that lets you interact with external data in a secure manner.

I have seen many useful blogs that give you introduction to MOSS 2007 SSO. I am going to try to differ a little bit by walking you through basic steps of configuring external data sources and accessing the data using a web part in MOSS 2007.

Why do we need to use MOSS 2007 – Single Sign-On (SSO)?

MOSS 2007 SSO facilitates securely accessing external data sources from MOSS 2007. The major advantage with using this approach is all external data source credentials passed to MOSS 2007 are encrypted and just plain text. You may be accessing ERP systems like Siebel, SAP which may in turn be using any databases and you don't want to be passing your login credentials without encryption. Further, BDC can be configured to use SSO to access external data securely.

In our example, we will access a SQL Server database. For demo purposes, I have created a SQL Server 2005 database named "SSODemo". I have one table named "Customer" with 2 columns "CustomerName varchar(50)" & "CustomerPhone varchar(12) and a user with username "ssoDemoUser" has necessary privileges to access the database and perform DML operations.

Step 1: Navigate to Central admin — Operations — Manage Single Sign-On (should be listed as the last option under "Security Configuration" section )

If you get an error message on the screen which says

"Failed to connect to Microsoft Single Sign-on Service. To configure, please ensure the service is running"

go to Services and start the "Microsoft Single Sign-on Service" and refresh the Manage Single Sign-on page.

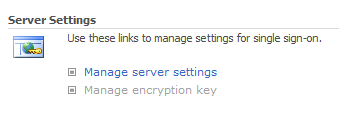
2: Select Manage server settings under Server settings

image

3: Enter all required information in the "Manage Server Settings for Single Sign-On".  and submit the form.

image

If you get an error message which says "You don't have rights", go back to the services and change the Logon credentials for "Microsoft Single Sign-on Service" to the exact domain account you will be using for the "Account name" shown in the screen shot.

Once the submit is successful you will be redirected back to the main screen. You will now see the "Manage encryption key" link enabled. If you click on it, you will be able to create,backup and restore encryption keys used in SSO operations.

4: Next step is creating a new Enterprise Application Definition. Click on "Manage settings for enterprise application definitions" and then "New Item"

sso_serversettings3

5: Fill in the information as shown in the screen shots below

image

image

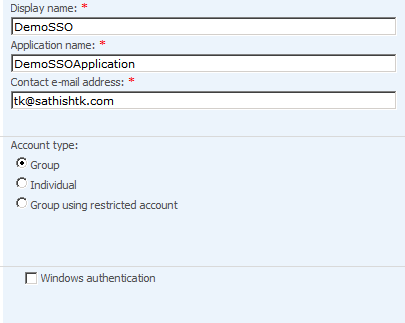
Note that username and password are 2 login credentials that we need apart from the datasource (which we will define using Share Point Designer — SPD) to access the SQL Server database. In terms of external ERP systems, you can define all the login elements required in this screen. Once you have entered all the information, submit the form.

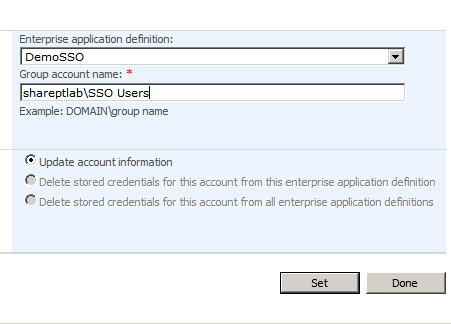
6: Next option is to set up account information. (select the 2nd option under "Enterprise Application Definition Settings). The screen that loads will enable you to setup new account information. I had created a domain group called SSO Users, but you can use any valid group in your domain.

image

On the next screen, we enter our SQL Server username and password. Recollect that I had created an user named "ssoDemoUser"

image

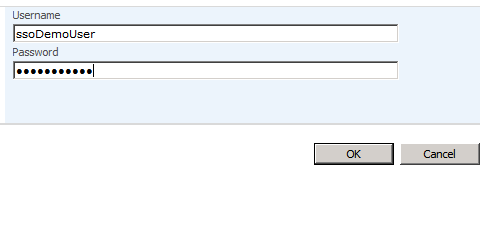
Select "Done" on the next form.

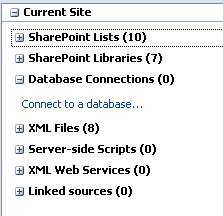
7: Next is configuring the data source using SPD.  In SPD, open Data Source Library under Task Panes and select Database Connections — Connect to a database.

image

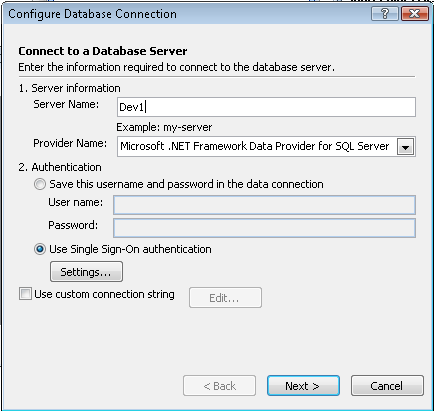
Select Configure Database Connection

image

In the Configure Database Connection, key in the server and for authentication select SSO

image

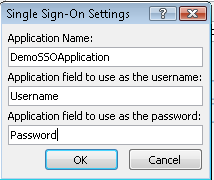
In the Single Sign-On settings, key in the following information (DemoSSOApplication was the application name we defined in the enterprise application definition)

image

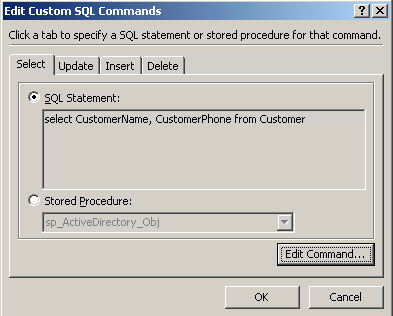
If the connection is successful, you will see the next screen where you can pick the option to run a SQL command or stored procedure.  Select the "specify custom Select" option to enter custom queries.

image

Select "Edit Command" button to enter a SQL statement

image

Select "OK" to all other forms.

8: You will now see a "Custom Query" section under

image

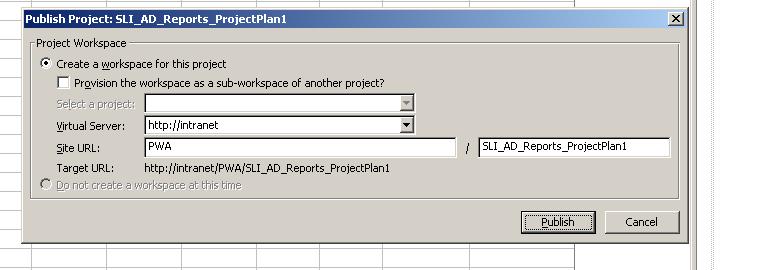
Drag and Drop the Custom Query to any page in your site. Check-in and Publish the page. You will now be able to see a web part displaying the query results from the database.

image

Pretty cool?

This is just a basic demo of showing MOSS SSO features. It is a powerful feature within MOSS 2007 to access disparate data sources securely.

Page copy protected against web site content infringement by Copyscape

TFS Team Project Portal and Project Server Workspace Integration

Ensure the following steps are done:

1) Installed & Configured MOSS 2007

2) Installed & Configured Project Server 2007 to integrate with MOSS 2007. Once the configuration is done, if you can access the pwa site from MOSS, you would be set.

3) Install & Configure TFS 2008 to integrate with MOSS 2007. Note: If your TFS talks to an existing instance of SQL, ensure SQL Reporting Services is installed but not configured. Let TFS do the configuration. This will reduce a lot of Reporting Services headaches. Enable VSTS Web access.

Once all that is done, it is time to integrate Project Server 2007 with TFS 2008

Open up a project plan, save it on the Project server. Publish the project plan but not create a work space.  If you encounter manual work space greyed out, like shown below 


Navigate to the PWA site and click on Server settings.  Under Operational Policies, click on Project workspace Provisioning Settings.


On the Project workspace Provisioning settings page, change the Provisioning Mode to the settings shown below.


Once that is done, you will now be available to publish the project plan and not configure the work space.

If you now are too excited 🙂 and jump to configure the work space to integrate with TFS 2008, you may encounter this error message


This happens because certain Project related features are not activated at the Team project site level. Go to the TFS Team project portal and click on Site Settings.

Under Site Settings –> Site Administration, click Site Features and activate the 2 project related features shown

(Project proposal workflow & Project workspace collaboration Lists)


Once this is done, you will be able to integrate Project work space with TFS Team project portal. Now, clicks on TFS Team portal and Project server work space Team project plan will take you to the same site.

Page copy protected against web site content infringement by Copyscape

MOSS Site Navigation – Obtain Page layouts programmatically 

Here is the code snippet that will help you obtain the site navigation structure of an existing site (this will be useful when you are trying to automate deployment of site structure to the target server)

Assuming web is of type SPWeb, SW is StreamWriter that writes to a xml file

 PublishingWeb pubWeb = PublishingWeb.GetPublishingWeb(web);
            
   try
      {
          if (PublishingPage.IsPublishingPage(pubWeb.DefaultPage.Item))
          {
               SW.WriteLine("<page site=\"");
              \\ this will give you the site page name
              SW.Write(web.ServerRelativeUrl.Remove(0, 1));
              SW.Write("\" pagelayout=\"");
              \\ this will give you the Page layout name
              SW.Write(PublishingPage.GetPublishingPage(pubWeb.DefaultPage.Item).Layout.Name);
              \\ this will give you the Page title
              SW.Write("\" title=\"");
              SW.Write(pubWeb.DefaultPage.Title); 
              SW.WriteLine("\" />");

  
           }
      } 

I have left out the exception handling part and other detailed code. This is just to give you an idea about the methods available with the PublishingWeb object that will fetch you the site names/page layouts/title details.

Remember, this code snippet has to be called recursively for each SPWeb available under SPWeb.Webs


Page copy protected against web site content infringement by Copyscape

Code Metrics in VS 2008

 I am not sure whether you have tried the Code Metrics tool in VS 2008. It is a very handy tool and simply answers the question "How difficult is your code to maintain?"

You need to know how to interpret different code metrics to take corrective actions:

Maintainability Index — Should be high as possible. 100 is the target you want to achieve. This index is an aggregate of all the code metrics indexes (code complexity, lines of code, inheritance depth and class coupling)

Cyclomatic Complexity — Number of branches your code takes (switch, case, if statements). You want to keep this number low.

Depth of Inheritance — Inheritance chain. You want to keep this value as low as possible. Every time you inherit, the value goes up by 1. You want to avoid the bad cascading effect (Poorly designed class will cause the entire inheritance chain difficult to maintain)

Class coupling — this shows the dependency between different class types. If this number is higher, it means your code will become difficult to maintain. Just imagine you had numerous classes calling each other methods without any discipline.

Lines of Code — Keep a tab on the number of lines of code you have to write. With the advancement of tools and technologies, people are moving towards lesser number of codes. Keep in mind the line of code does not include the number of lines used for attribute definition, comments declaration and constructs.

There is no hard and fast rule on what the code metrics index value should be. Your project can be complex and the index numbers could be high.

An insight into code metrics will help you identify the problem areas and help you refactor code if needed.

Page copy protected against web site content infringement by Copyscape

Let us take a performance snapshot on using Row Constructors in SQL 2008

Example table:

create table Customer
(customerID int primary key clustered identity(1,1)
,firstName varchar(30)
,lastname varchar(30)
, age int
)

— SQL 2005 method

begin transaction
insert into customer values ('Joe', 'Smith', 35)
insert into customer values ('Jane', 'Smith', 36)
insert into customer values ('Daniel', 'Smith', 37)
commit transaction;

— SQL 2008 method (row constructors)

begin transaction
insert into customer values
('Joe', 'Smith', 35),
('Jane', 'Smith', 36),
('Daniel', 'Smith', 37),
('John', 'Smith', 38)
commit transaction;

As you examine the different variables, you will notice that SQL 2008 Row constructor method fares much better for the scenario described.


Page copy protected against web site content infringement by Copyscape

You may come across situations where you need to add custom styles (css) to edit text inside your content editor web part. To enable custom styles to you web part, open your master CSS file used for your site and add an entry that follows the naming convention of

.ms-rteCustom-xxxx

where xxxx is the custom name of your style.

Note: When you add custom style entries to your CSS file, the content editor will override the existing styles (ArticleByLine,ArticleHeadline,ArticleTitle) and only show the custom styles you had created.

.ms-rteCustom-SampleTitleByTK

{   

font-weight: bold;

font-family: Arial   

font-size: 14pt   

color: #8F2031;   

text-transform: capitalize;

}

Once this link is added, you will see the option available in your content editor web part as shown below


Page copy protected against web site content infringement by Copyscape

I had a requirement to show the top 3 of news listing on the home page with the option of having these links open up in a new window.

First read these 2 good articles

http://blogs.msdn.com/ecm/archive/2006/10/25/configuring-and-customizing-the-content-query-web-part/

http://www.heathersolomon.com/blog/articles/customitemstyle/

Now, when it comes to locating the internal name and the field type, you may encounter some issues. Refer to Heather Solomon blog where she has some pointers.

1) Create a site column named "OpenInNewWindow" and make that a choice type with values "true" and "false"

2) Create all other site columns as required.

3) Include the site columns in your custom list.

4) Edit ItemStyle.xsl and include the following lines in your template section

        <xsl:variable name="LinkTarget">   

<xsl:if test="@OpenInNewWindow = 'True'" >_blank</xsl:if>

        </xsl:variable>


You will then be able to use this variable in your <a href> reference target target="{$LinkTarget}"  

Once you create a new item in your list and set the OpenInNewWindow variable, the link will open in a new window if value is set to "true".   

Row Constructors in SQL 2008

Let us delve into using Row Constructors

Two basic tables for test purposes

Customer

IF  EXISTS (SELECT * FROM sys.objects WHERE object_id = OBJECT_ID(N'[dbo].[Customer]') AND type in (N'U'))
DROP TABLE [dbo].[Customer]
GO
create table Customer
(firstname varchar(30)
,lastname varchar(30)
)

Customer1

IF  EXISTS (SELECT * FROM sys.objects WHERE object_id = OBJECT_ID(N'[dbo].[Customer1]') AND type in (N'U'))
DROP TABLE [dbo].[Customer1]
GO
create table Customer1
(firstname varchar(30)
,lastname varchar(30)
, age int
)

Use with INSERT statement to insert multiple rows as an atomic operation:

— SQL 2005 method
insert into Customer (FirstName, LastName) values (Alex, 'Smith')
go

insert into Customer (FirstName, LastName) VALUES ('John', 'Smith')
go

— another SQL 2005 method

insert into Customer (FirstName, LastName)
select 'Alex', 'Smith'
union all
select 'John', 'Smith'

— Rewriting with SQL 2008

INSERT INTO Customer (FirstName, LastName)
VALUES
 ('Alex', 'Smith'),
 ('John', 'Brown'),
 ('Daniel', 'Williams');

Using Row Constructors as a DataSource – On the Fly!

SELECT *
  FROM
     (
       VALUES

       ('John','Smith')

      ,('Alex','Smith')

     ) Customer(FirstName,LastName)

As  you see above, I just created a datasource named Customer on the fly. Try running this and you will see that the datasource is treated as a table here (not created on SQL Server though).


Another example of Row constructors as data source

select c.firstname
, c.lastname
from Customer c
join
(
 values('John','Smith'),('Mary','Smith'),('John','Williams')
) customerTemp(FirstName,LastName)
on c.firstname = customerTemp.firstname 

Ability to include scalar subqueries as elements in row constructors

insert into Customer1
values
('Alex','Smith',30),
('Robert','Smith',35)

insert into Customer(firstname, lastname)
values(
(select top 1 firstname from Customer1),
(select top 1 lastname from Customer1)
)

I will try to do some benchmarks on using Row Constructors on my next post.