One awesome feature of Kubernetes is the replicasets. Simply put, say you want to run multiple pods – x number of pods all the time for fault tolerance. It is often used to guarantee the availability of a specified number of identical pods identified by labels.

Replicasets will enable you do this. I would strongly encourage you to check out kubernetes.io to read more about it plus the site has tons of useful documentation for everything related to Kubernetes

Here is a complete yaml file that you can readily use to create replica sets. Note: I will try to keep this file updated as some of the specs may change with future versions. I am using Bitnami’s Ghost container for demo purposes

apiVersion: apps/v1
kind: ReplicaSet
metadata:
  name: mywebapp
  labels:
    app: mywebapp
spec:
  # modify replicas according to your case
  replicas: 7
  selector:
    matchLabels:
      app: mywebapp
  template:
    metadata:
      labels:
        app: mywebapp
    spec:
      containers:
      - name: ghost
        image: ghost

If you see the yaml file above, the definition lets you create 7 pods and will ensure at least 7 pods remain active all the time.

Some of this is straightforward yaml definition but important concept is understand that all pods are going to have labels and the replicaset is going to use those labels to ensure at least 7 pods with that label exists.

The line selector: matchLabels: will look at the right pod label and spin up the required number of instances defined.

You can readily use this yaml file and run this command to create the pods

kubectl create -f mywebapp-replicasets.yaml

So, you have your test Kubernetes cluster up and running and you are trying to find out the status of your cluster by typing these commands after a fresh reboot

kubectl cluster-info

You start getting a connection error, so you try out the next command to get the status of your pods

kubectl get pods --all -namespaces
kubernetes error

Same error. So, majority of times the fix is disabling all swaps

sudo swapoff -a

Note, we are talking about test cluster here. In a production cluster, interact with your Linux sys admin to under the impact of these changes. Finally, when you issue the command for your cluster-info, you should get this message

kubernetes cluster info

This is a simple walk-through so you can setup a local cluster up and running. Cloud platforms have their own versions of Kubernetes where master node is usually a managed service and the worker nodes are compute machines. I have avoided putting in specific version numbers to just give you an idea of the install process.

In the future, I believe each OS will have seamless way to install Kubernetes with pre-built installation packages. Now, let us stick with a basic test cluster to play around with.

In my cluster, there are 3 VMs with Ubuntu as the OS

ubuntu1 – will act as the master node

ubuntu 2 & 3 – worker nodes

Ensure you can ssh into the boxes, and you are ready to run the commands. Make sure you have unique MAC and product_uuid in case you have cloned VMs. Each machine should have a dedicated ip.

These commands should be run on all 3 nodes

— Regular package update

sudo apt-get update

— Update for https repo access

sudo apt-get install -y apt-transport-https curl

— Add key for the new repository. Make sure you add the sudo command before your apt-key add

sudo curl -s https://packages.cloud.google.com/apt/doc/apt-key.gpg | sudo apt-key add -

— Now, add the repo

sudo vim /etc/apt/sources.list.d/kubernetes.list
deb http://apt.kubernetes.io/ kubernetes-xenial main

— Install Kubernetes and Kubernetes networking CNI

sudo apt-get update
sudo apt-get install -y kubelet kubeadm kubectl

— The networking aspect now. Pick any of your favorite, but for this cluster, I will pick flannel. You can also use weave net as well

kubectl apply -f https://raw.githubusercontent.com/coreos/flannel/master/Documentation/kube-flannel.yml

— Let’s install docker,


sudo apt install docker.io -y

— Verify install is working by running these commands

which kubeadm
which kubectl
docker -ps

Now, the real fun starts with assigning ubuntu1 as the master node, how do we do that? Execute the command. You can actually add flags to set the token not to expire, but let us keep this simple

sudo kubeadm init

— Follow the instructions on the screen to execute the following commands

mkdir -p $HOME/.kube
sudo cp -i /etc/kubernetes/admin.conf $HOME/.kube/config
sudo chown $(id -u):$(id -g) $HOME/.kube/config

— Execute this command on the worker nodes (your security token will be different).

kubeadm join 192.168.198.132:6443 --token iptt5e.hszynj998ztugg47 \
    --discovery-token-ca-cert-hash sha256:331560a34e8a1e8b4001462e951e2d502bfe9a3c73279b43ebae7365835a30e3 --skip-preflight-checks

Now, after the command is executed on the worker nodes, we can run the following command to make sure, the cluster is operational. Look for the status of Ready on the nodes

sudo  kubectl get nodes

If you encounter issues, do a check on the specific node.

kubectl describe nodes ubuntu1

In the future posts, we will build up on this cluster and deploy some sample applications. Helm as the package manager has a lot of features that we can explore along with the k8 dashboard.

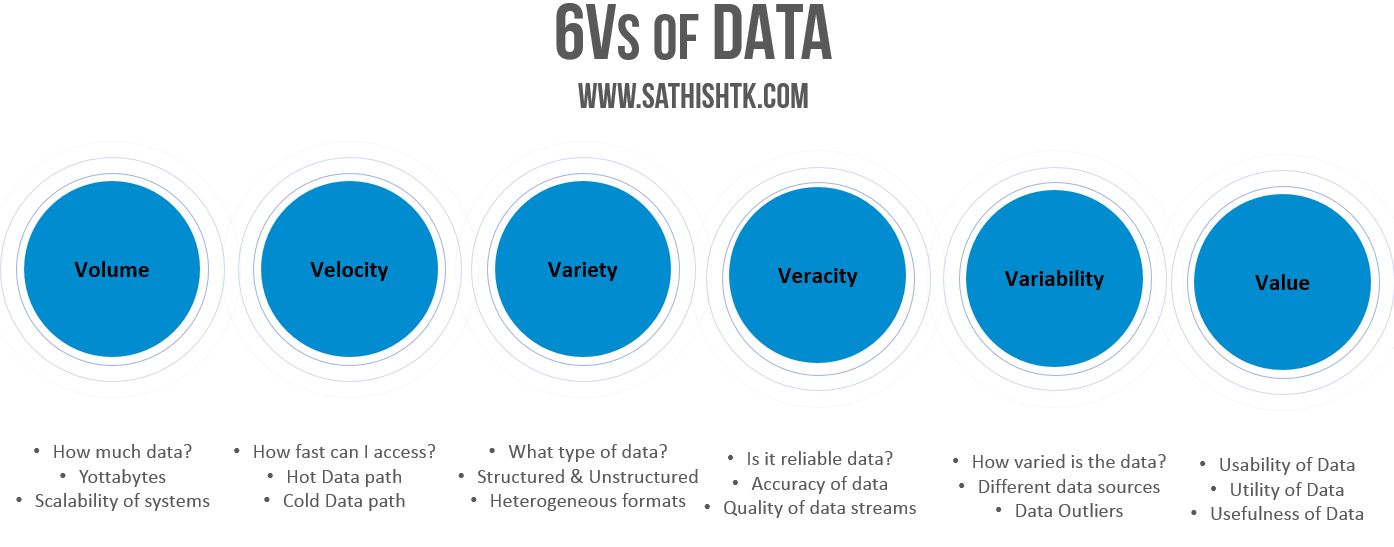
Big data involves data collection from remote sensing devices and networks, Internet-powered data streams, systems, devices and many other sources that brings massively heterogeneous and continuous big data streams. You need to design the solution to effectively handle data to store, index, and query the data sources which poses big challenges. Big Data properties are commonly referred as 6Vs that is outlined below which includes volume, velocity, variety, veracity, variability and value.

What is reactive extensions and how is it used in Angular 2?

reactivex.io  is the web site you need to visit to learn more about Reactive extensions.Any time you are connecting to the server, the ng Team is using the classes from ReactiveX. Remember, the observer pattern from the good old days, it is coming back again with the iterator pattern throwing in functional programming 🙂

My session will be hands on demo using Nintex Forms and Workflows to connect to SAP and Oracle. You will get to watch & listen to real case studies and demos of integrating SAP & Oracle data with SharePoint using Nintex forms and workflows. Check out the session details at

See you in Las Vegas at Nintex InspireX conference from Feb 22-24, 2016

Privileged to announce that I got an opportunity to lead a talented technical team that won the Nielsen Norman Group Best Intranet Award 2016 Worldwide.

Check this out
Built on SharePoint 2013, American Cancer Society’s new intranet replaces a number of disparate sites and systems, and eliminates outdated and redundant content, helping ACS reduce the number of servers needed and their associated costs by 62%.

“ACS worked to consolidate a set of sites built on outdated technology, with the goal of increasing engagement and encouraging collaboration,” said usability expert Jakob Nielsen, principal of Nielsen Norman Group. “The team created a site with a strong structure, inclusive resource library and many opportunities for employees and volunteers alike to learn, share and communicate.”

One of the biggest complaints about ACS’s previous system of siloed intranets was how difficult it was to find documents and information. Neudesic incorporated this and other user feedback into a mobile-responsive “search first” experience that leverages SharePoint 2013 Enterprise search capabilities to drive the site’s ultimate goal of increasing adoption.

“From identifying user personas to defining strategy and IA to designing and testing prototypes, it took a well-coordinated team effort to deliver the best possible experience for ACS users,” said Sathish TK, Neudesic Senior Solution Partner, Portals & Collaboration. “This recognition by Nielsen Norman is testament to the validity of our mobile first, user-centric approach to intranet design.”

A post-launch survey revealed that 71% of ACS staff visit Society Source every day to learn the latest cancer and organizational news and connect to resources, tools and people to help them perform their jobs. The new intranet is now the “most useful” of the eight channels ACS uses for internal communications.

“Society Source helps us create a single, aligned organization, presenting the opportunity for revamped governance and security policy – with well-defined roles and responsibilities – that extends across multiple platforms, such as hardware, software, internet browsers, mobile devices, etc.,” said Amy Hadsock, Senior Director, New Channels, ACS.

Visit Society Source for more information on the design and functionality of ACS’s award-winning intranet.

I have been asked numerous times on how a developer can get into Big Data development space. Although there is not a single right answer, I have laid out the approach you can consider taking. Depending on when you read this post, many Big Data players are moving towards developing solutions that are very easy to use by developers using SQL like languages.

I would encourage developers to start with Hive. Move on to Pig and then Scala or Python. 
Hive — Using query language based on SQL (HiveQL), you can write SQL queries that are transformed into MapReduce tasks. This is a good transition if you are coming from the relational database world.
Pig — Creates MapReduce jobs and can be extended with Python UDFs or Java. Procedural type language. Great candidate for simple data analysis tasks.
Scala —  This is a full programming language for Big Data developers. Complex language to learn but very powerful.
Start with playing around with basic ETL tasks using Hive or Pig and then move into Scala. Python is always a strong candidate and with many libraries available in Python for data analysis and ML, you can’t go wrong with it.
But for a quick learning road map, follow the bottom up approach shown in the diagram below

Page copy protected against web site content infringement by Copyscape

In Part 1 , and Part 2 of the series, we walked through setting up of project and App.js respectively. In this concluding post, we will look at how the html files are coded.

First, the customer.html file – Pretty straightforward
<H2> Customer Information </H2>
        <table>
            <tr>
                <th>Customer ID</th>
                <th>Customer Name</th>
                <th>Customer Address</th>
                <th>Customer State</th>
                <th>Customer Country</th>
            </tr>
            <tr ng-repeat=”customer in customers”>
                <td><a href=”#/{{customer.CustomerID1}}”>{{customer.CustomerID1}}</a></td>
                <td>{{customer.CustomerName}}</td>
                <td>{{customer.CustomerAddress}}</td>
                <td>{{customer.CustomerState}}</td>
                <td>{{customer.CustomerCountry}}</td>
            </tr>
        </table>
Look at the ng-repeat directive. This is what does all the magic here. Recollect, in Part 2 , we coded something like this,
$scope.customers = data.d.results;
$scope is the execution context for expressions. $scope is the glue between application controller and the view. In our case, the view is the HTML file, we already defined the controller, now it is a matter of connecting them together via the $scope variable.
As you would guessed, the orders.html is also simple:
<h2>Orders Page</h2>
    <table>
            <tr>
                <th>Order ID</th>
                <th>Order Name</th>
                <th>Order Date</th>
                <th>Order Ship Country</th>
            </tr>
            <tr ng-repeat=”ord in orders”>
                <td> {{ord.OrderID}}</td>
                <td>{{ord.OrderName}}</td>
                <td>{{ord.OrderDate | date : format}}</td>
                <td>{{ord.OrderShipCountry}}</td>     
            </tr>
        </table>
 
You can always add in the customer name as the header so it makes sense to list the customer and the orders. That is for you to try out since it is very straightforward 🙂
Once you are done with all this, build your project, and deploy it from Visual studio. You deploy the apps to the apps site collection and you can launch it by clicking on the app name
Happy Coding!!!