Page copy protected against web site content infringement by Copyscape


In MOSS 2007, there was no possible way to browse unattached content database (excluding third party tools). SharePoint 2010 lets you browse a content database without attaching it to the farm. The following walkthrough will show you the steps to browse an unattached content database.

I will show you the steps to recover a list that was deleted from one of the site collections.


Here is my original list named “TKDemoList” consisting of 2 list items with attachments.

image

The list is deleted

image


Now, to recover the list. Go to Central Admin –> Backup and Restore –> Recover data from an unattached content database (under “Granular Backup”)

image


In the Unattached Content Database Recovery screen, fill in the information. WSSContentDemo is the backup copy of my original content database before the list was deleted.

image

In the Browse Content screen, pick the site collection, site and the List


image

You can also browse all sites by changing the site in the Site drop down list. The following shows the sites present in my site collection

image


In the Site or List Export, type in the filename (in the format of \\servername\sharename\filename.cmp)

 image


Once the export is done, you can verify the job status. You can also browse to the folder where the cmp file is created to view the export log file.


image


The next step is importing the list into our site collection. We will use the mighty SharePoint Power Shell to do this. You have 2 options, you can either type in the Import-SPWeb command in the following format

Import-SPWeb -Identity <Site URL> -Path <Export file name> [-Force] [-NoFileCompression] [-Verbose]

(or) just Import-SPWeb and let it walk you through the steps


image

You can review the log file that is created and you will see all the list items and attachments restored. The screen shot shows the 2 documents that were imported.


image

Back to the site collection, you can view the TKDemoList that was restored.

image

image


I did notice that Import-SPWeb took a while to import 2 list items with a collective attachment size of 1.2 MB. It will be interesting to see the performance once the RTM product is out.

Time for Phillydotnet usergroup Code camp. We have a whole track dedicated to SharePoint. My session will cover sandboxed solutions development with SharePoint 2010 and SharePoint 2010 Application Lifecycle management (ALM) using Visual Studio 2010 and TFS 2010.

As of this date, the registrations for Code camp is close to 500 participants. 12 different tracks.

Main Link: http://codecamp.phillydotnet.org/2010-1/default/

Session Details: http://codecamp.phillydotnet.org/2010-1/Lists/Sessions/By%20Track/

Join in and see you there!


Page copy protected against web site content infringement by Copyscape

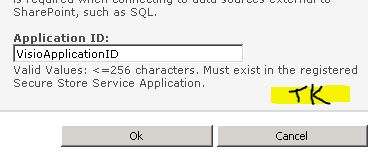
I was setting up a demo to populate a Visio 2010 (Beta version) data diagram that reads data from a SQL Server table. I created the data connections in Visio, saved it as Web drawing and published to SharePoint 2010 successfully. But, when I go to view the Visio diagram on the web that is connected to SQL server table, the refresh did not work and an error cropped up "The server failed to process the request". It was baffling initially, since I had another Visio diagram talking to a SharePoint 2010 list working without any issues. Upon reviewing the event viewer, the following error message was logged "Credentials were not found for the current user within the target application 'VisioApplicationID'. Please set the credentials for the current user."

So, the fix is to navigate to Central Administration — Manage Service Applications —  Visio Graphics Services — Global Settings and check the Application ID

Go back to Manage Service Applications — Secure Store Services — select the visio application id — Set credentials 


Once you set the username and password credentials, save and exit. This will fix the refresh and the visio graphics services error logged in the event viewer.


It's time again for another community presentation on SP 2010. I will be presenting 2 sessions at New Horizons, King of Prussia on Feb 4, 2010 — SharePoint 2010 Preview and Business Intelligence (BI) with SharePoint 2010.

SharePoint 2010 will cover Administration, ALM, VS 2010, Visual Web Parts, Document Library integration with Office 2010, and SPD 2010.  I also have a BCS presentation that shows how to modify and integrate external LOB data.

On the BI session, it will be a combination of excel services, Performance point, Visio web services and BI controls in SP 2010.


Page copy protected against web site content infringement by Copyscape

There are plenty of resources on the web for VMware Virtual Disk expansion. Some of them offer detailed steps and very helpful. I am sharing with you the steps I followed. As always back up your entire machine before attempting this. This is applicable only for your non-production environment.

How many times do you end up creating a test lab and you finally figure that you are running low on virtual hard disk space because you started loading all possible applications for testing? Since, it is a test lab, you probably figured that I had one single virtual disk that hosts application and OS files. So, any standard hard disk expansion methods would naturally fail because of active OS files.

Environment:

Virtual Machine OS – Windows Server 2008 x64 Trial Edition

Host OS – Windows 7 x64 bit

Virtualization Technology: VMware Server 2 (yes, it is free). As of writing this blog, MS Virtual PC does not run on x64 bit.

Files Required: Windows Server 2008 x64 DVD and GParted Live ISO file/CD.

Open up VMware Infrastructure Web Access and login with the host machine administrator credentials

vmware

On the Inventory pane, select the machine that needs virtual disk expansion.

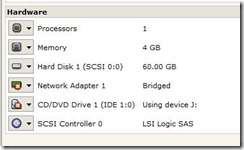
In the Hardware section, select the hard drive and click on the dropdown option to select “Edit”.

Hardware_Pane

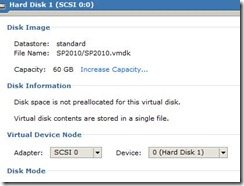
In the window that loads, select “Increase Capacity”

HD_IncreaseCapacity

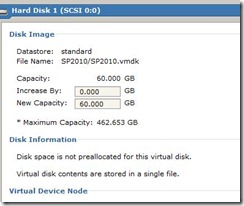
In the Hard disk properties window, type in the additional hard disk capacity needed in the “Increase By:” text box

HardDisk_Size

You are done with increasing the hard disk space.  It is that easy, but if you login into your Virtual machine and review Disk management, you will see this new disk space showing up as unallocated disk and you will have options only to assign a new drive letter since the primary disk hosts the OS files and there is no easy way to expand the OS disk (which is really why you are following all the above steps). If you had logged into your VM, it is time to shut down the machine.

Okay, now you need to download GParted LiveCD. I used the gpparted-livecd-0.3.4.-11 version.

Once you download the iso file, you can use  MagicISO to mount the iso file and boot the VM from that drive.  You can always add another CD/DVD hardware and mount the iso file to it and boot from the newly added drive.

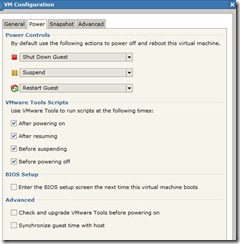
If you don’t have the VM to boot from CD, it becomes a pain to try to hit the function keys to get into the BIOS. VMware Server 2 has an easy option to load the BIOS on startup. Navigate to the “Commands” pane on the “Summary” tab and select “Configure VM”. Select the “Power” tab and under “BIOS Setup”, check the “Enter the BIOS setup” option

NextTime_BIOS_Setup

Once you boot from the CD, GParted configuration option loads. The directions are fairly straightforward. If you search, you will find tons of resources do it. You can always to the GParted home page and review the documentation

http://gparted.sourceforge.net/documentation.php

Assuming, that you were successful to expand your primary hard disk, you will assume that everything is done and you will start up your VM. Yes, you will be greeted with windows OS error messages. Okay, now load up your windows 2008 server CD and reboot the machine. Hit any key on start up, to boot from the CD/DVD. Once the windows setup loads, select “Next” to language settings and select Recover windows option.

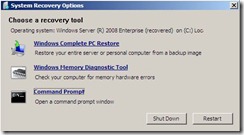
On the System Recovery Options window, select “Command Prompt”

recovery1

In the command prompt, type in “cd recovery” and hit enter

recovery2

In the recovery folder, type in “StartRep.exe” command

recovery3

Let the process complete successfully, and you can restart the machine. You now have a VM machine with the expanded virtual disk.

If you are in Philadelphia area, you may want to consider attending a SharePoint 2010 Preview session at New Horizons Wayne office. I will presenting and showing you some of SP 2010 features. SP 2010 Administration, ALM, VS 2010, Visual Web Parts, Document Library integration with Office 2010, and SPD 2010.  I also have a BCS presentation that shows how to modify and integrate external LOB data.

See you there!


Page copy protected against web site content infringement by Copyscape

SharePoint 2010 Beta 2 and TFS 2010 Beta 2 Integration

Environment Setup:

Two different servers

  • TFS 2010 Beta2 with SQL Server 2008 R2
  • SharePoint 2010 Beta 2 with SQL Server 2008 SP1 with CU (My post on SharePoint 2010 Beta 2 installation has the exact KB number)

I could have just used one data tier, but I was playing with so many beta versions and wanted to see how SQL 2008 R2 worked against TFS 2010 Beta 2, so dedicated a separate instance. You can just use one common data tier for TFS & SP. In my case on the SQL 2008 R2 box, I had to configure Network protocols (SQL Configuration Manager) to enable TCP/IP & NetBios.

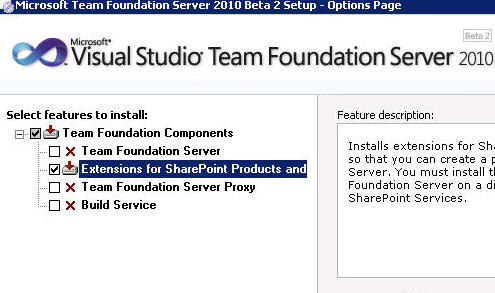
Note: Extensions for SharePoint installation option will show up only when SharePoint instance is found on the local server. If you pop in TFS 2010 Beta2 ISO file and carry on with the installation and don't see "Extensions for SharePoint products", that is the reason. You have to install Extensions for SharePoint products on all instances of SharePoint to tie the integration well.

Step 1: Install "Extensions for SharePoint Products" on all your SP 2010 Beta2 server.

Step 2: After installation, run the Extensions for SharePoint products configuration wizard. Once the configuration is complete, bring up Team Foundation Server Administration Console and click on Grant Access option

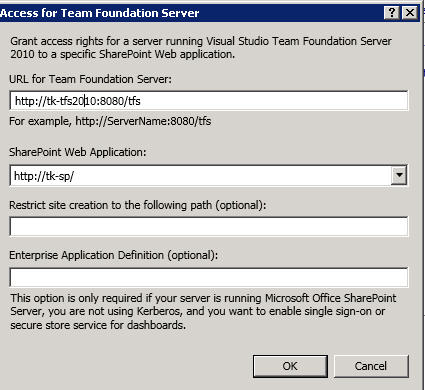
Step 3: In the Grant Access window, type in entries as shown and OK

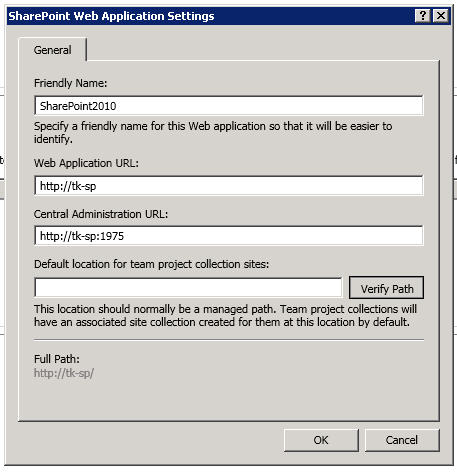
Step 4: Log into your TFS server and bring up TFS Administration Console. I had skipped the SharePoint configuration during TFS configuration, so I have to go back and setup "SharePoint web applications". Expand "Application Tier" and select "SharePoint Web Applications". Click on "Add SharePoint Web Application" and register entries

Click Verify Path and you will be notified that the path is valid.

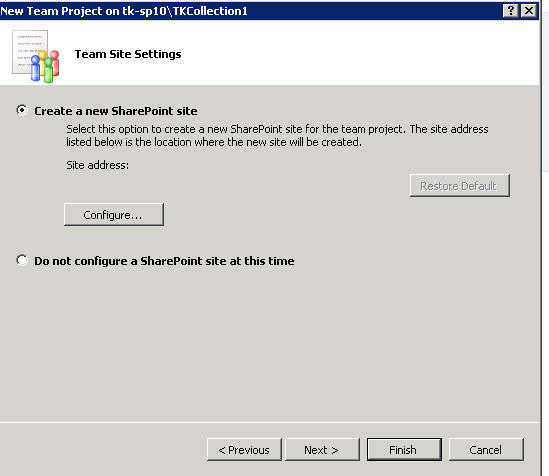
Step 5: Open up VS 2010 and connect to Team Foundation Server 2010. After connectiong, create a sample team project and when the "Team Site Settings" page displays, select "Create a new SharePoint site" option and select "Configure".

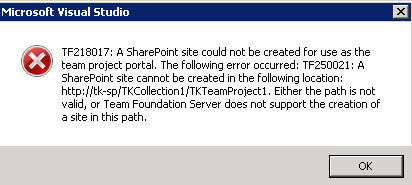
Accept the default values and proceed to the final screen and select "Finish".  I encountered the following error messages: TF218017 and TF250021

After some digging around with the TFS Install and Admin guide, discovered that I had to configure SharePoint site on "Team Project Collections"

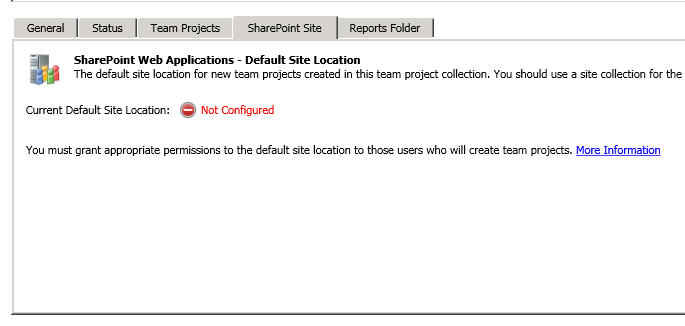
Step 6: Log back into TFS 2010 Beta 2 server and load TFS Administration Console. In the admin console under Application Tier, select Team Project Collections and select the SharePoint tab on the lower pane. The first time you navigate to that screen, you will see the settings as below

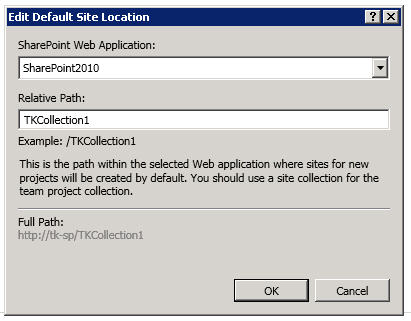
Click on Edit Default Site Location and modify entries

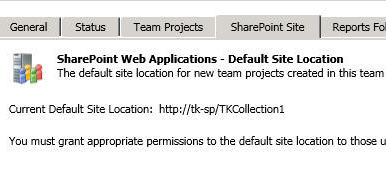
You will be prompted with a confirmation to create a new site and upon accepting, you will see a confirmation screen as shown


You should now be able to go back and create the team project without any errors. You can view the team project portal and if you notice the url, it will point to the SP instance.

Now you have TFS 2010 Beta 2 integrated with SP 2010 Beta 2.

Hope this was helpful!


Page copy protected against web site content infringement by Copyscape

SharePoint 2010 Beta 2 Installation

Let me share my SharePoint 2010 Beta 2 installation experience:

Environment before SP 2010 Install

  • Windows 2008 with SP1
  • SQL Server 2008 SP1

The SP 2010 pre-requisite installer does a good job of installing all the pre-required software. One catch was that I had PowerShell installed already and the installation failed on the PowerShell part. So, I had to go and remove the previous version of PowerShell (In Windows 2008, this would be on the Feature list of IIS 7.0)

I also downloaded Windows 2008 server SP2 and PowerShell 2.0 CTP 3 and installed it before running the pre-requisite installer again.

So, the rest of the installation went smooth till I got to SharePoint 2010 Configuration Wizard. The configurator complained that the right SQL Server version is not installed. After reading the error message clearly 🙂 I went and downloaded the SQL Server 2008 SP1 Update Patches from

http://support.microsoft.com/kb/970315

For my SQL Server SP1 installation, I had to patch it with 399850_intl_x64.zip

The SharePoint configuration wizard finished successfully and I went it to activate my service applications and selected all default values and got an error message

"The service application proxy "User Profile Service Application" could not be provisioned because of the following error: Unrecognized attribute 'allowInsecureTransport'. Note that attribute names are case-sensitive."

Upon research, found out the issue is notable in the beta release. The SharePoint MSDN team blog as well as this site

http://blogs.msdn.com/opal/archive/2009/11/16/installation-notice-for-sharepoint-2010-public-beta/ had this problem documented. I followed Jie Li's link to download WCF patch for Windows 2008 and rebooted my server. Upon restart the User profile service and synchronization service was started. Followed the elaborate steps mentioned in Jie Li's blog regarding User profile synchronization service.

For now, I am ready for some SharePointing stuff!


Page copy protected against web site content infringement by Copyscape

Just back after attending the SharePoint 2010 conference. Very impressive new features in SharePoint 2010 for developers This is definitely not the complete list, but some of my favorites.

Note: Visual Studio 2010 SharePoint projects will work only with SharePoint 2010. Hard luck, can't use the cool features for MOSS 2007 development.

Developer

  • Finally, we can now use client OS (Windows 7/Vista SP1) for SharePoint development. Of course, x64 bit. No need for a separate VM.
  • Integrated Debugging — Yep, you read that right. Debugging your web parts just got a lot easier. Dump your "attaching to worker process" headache. Developer Dashboard provides you with detailed debugging information and performance analysis which will help with problem isolation and fix.
  • Deployment of web parts is integrated within VS 2010. Click F5 and watch build, package & deploy. Yes, you can customize the deployment process.
  • VS 2010 has now in-built support for Visual Web part development. You can use the designer to control the look and feel of your web part.
  • Cascading deletes with Lists — Handle with care — but powerful feature. Out of the box support for linking lists. Lists have been scaled to accommodate millions of rows.
  • Client Object Model (OM): Tons of posts will invade the web, but for now remember — it is API on steroids with ability to select, add, manage and update data in SharePoint. Overcome current restrictions of MOSS web services and full support for JavaScript. Also, OM is very low on file size, so easy to redistribute.
  • REST APIs support through ADO.NET Data Services — Yes, strongly typed and full support for REST protocols — ATOM, JSON, & ATOMPub. Use REST to pull data from Lists, Cloud and Excel sheets.  
  • LINQ — If you have not learnt LINQ, I would urge you to do so… LINQ to SharePoint provider is slick for Entity based programming and can be used in event receivers, webparts etc.,
  • Ribbon Framework — People who love the Ribbon, now you have a complete framework to go crazy and this stuff is very extensible.
  • BCS – Business Connectivity Services (our good old BDC supercharged) — With ECT- External Content Types (imagine this as the structure of external systems — methods, fields, connections), BCS can pull in external data into SP 2010. There is a bunch of enhancements on business data connectivity like custom connections, batch operations, and read and write capabilities. Plus, now we have a GUI type interface to modify application definition files.
  • Out of the box ALM (Application Life Cycle Management) support for SharePoint development with Team Foundation Server(TFS) 2010. Code versioning, Code Coverage, CI Builds, Batch builds, Code quality metrics, Work Item Tracking, Automated Load Testing are all integrated for SharePoint development.
  • Sandboxed Solutions — Follows a iterative development and easy deployment model with a separate process for solutions. The good thing is that Sandbox solutions can be restricted by Code Access Security (CAS)  and exposes a subset of Microsoft.SharePoint API. As you may guessed by now, Sandbox solution can not be used to develop Visual web parts but Event/Feature receivers, List definitions, Site Pages, Content Types, Infopath Forms services and SharePoint online are all supported.
  • Service Applications — Bye, bye SSP. SSP was all or nothing, but now, each web apps can determine what type of service applications it needs.  Service applications can now be shared between farms. Developers who have good WCF experience can now go crazy and develop their own service applications (core service app, app proxy, app end point) enable service apps for discovery and write consumers (web parts, Power Shell cmdlets). You would definitely want to consider writing your own service apps when you want a scalable solution that can share data between site collections.
  • Plus,  Visio Services (No problem if you don't have visio client, real time data can be shared to a SharePoint Site. Visio diagrams can have different data sources like SharePoint Lists, SQL Database and Excel sheets) is a welcome addition. Excel Services is all beefed up. Not to mention that BI integration with SharePoint is whole lot easier now. Tons of enhancements to Analytic reports. KPIs can be easily deployed from Performance Point to SharePoint sites. Feed Performance Point with data from lists and document libraries.


More to come…..

Page copy protected against web site content infringement by Copyscape

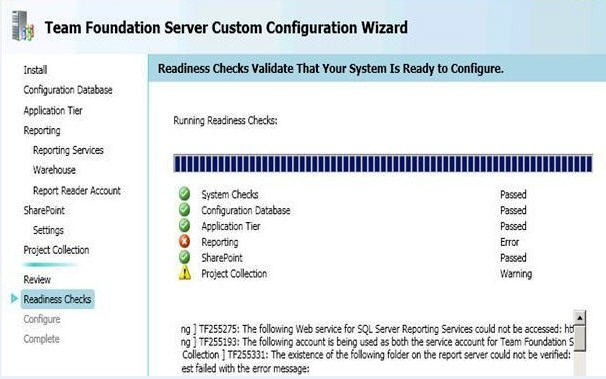
I was in the process of configuring TFS 2010 Beta 1 and the configuration wizard was failing on Reporting Services with error message TF255275: SQL Reporting Services could be accessed…..

Server: Win 2008 x64

Database: SQL Server 2008 x64  

The issue was my existing Reporting Services database was configured for SharePoint mode. So, use SQL 2008 Reporting Services Configuration — Database — Change Database to create a new database for Reporting Services. This should take care of the problem. To understand RS Configuration in SQL 2008 for TFS 2010, refer to "Configure Reporting Server Manually" section in Beta1 Install Guide.